Potter 19 Rigging Guide

Written by Roger St. John, WWP-19 #1100, "Little Zephr"
June 2002


This procedure has two sections. The first section gives instructions for initially rigging the mast. This section includes a description of how to run the halyards (the lines for raising the sails), and how to install the shrouds and stays (the wires that hold the mast up). The second section gives a description of how to raise the mast once all the halyards, stays, and shrouds are connected.

Section 1 -- Where Do All These Cables and Ropes Go?

Note: I will assume for this procedure that you have a mast that has all of the hardware on it (cleats, blocks, etc.), but no lines or stays.

  1. Install the Shrouds and Stays:
  2. Note: It is probably easiest to rig the shrouds and stays with the mast in the trailering position on the boat. In these instructions I will assume the mast is here.

    1. The shrouds and stays (wires) approximately these lengths. The length is for just the wire; it does not include the length of turnbuckles, etc.:
    2. If the shrouds and stays are not connected to the mast, then locate these parts (See Fig 2, Fig 3, and 4):
    3. Do these steps to connect the lower shrouds (See Fig 1 and 2):
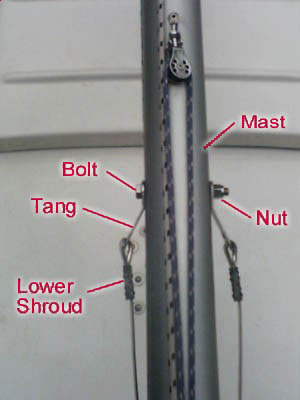
    4. FIG 1
      1. Take the tang on one of the lower shrouds and slip it on the bolt.
      2. Put the bolt through the hole that is in the middle of the mast. The bolt can go either way; it doesn't matter which side of the mast the nut is on.
      3. Put the tang from the other lower shroud on the end of the bolt and install the ny-lock nut. DO NOT TIGHTEN THE NUT. Drive the nut on just far enough to remove most of the slop between the tangs and the mast. The tangs should still rotate freely. Of you over-tighten the nut, it could dent and weaken the mast.
      4. Use a pin and cotter ring to attach a turnbuckle to the bottom end of each lower shroud.
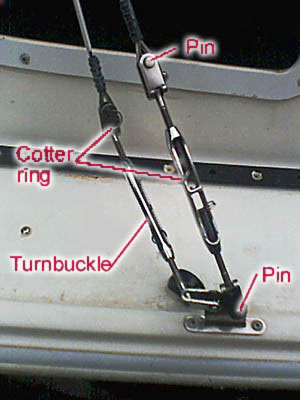

      FIG 2

      1. Use a pin and cotter ring to attach the turnbuckles for the LOWER SHROUDS to the FORWARD HOLE in the chain-plate (one on each side of the boat).

        Note: I prefer to have the cotter rings on the inside. The jib sheets catch them if they are on the outside. But, this shouldn't matter, because you SHOULD wrap these with rigging tape after you have tuned the rig.

    5. Do these steps to connect the upper shrouds (See Fig 3 and Fig 2):
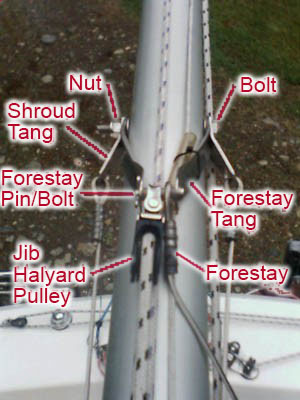
    6. FIG 3

      Note: The upper shrouds install just like the lower shrouds except you must add the forestay tangs.

      1. Take the tang on one of the upper shrouds and slip it on the bolt. Then slid one forestay tang on the bolt.
      2. Put the bolt through the hole that is 4 1/2 feet down from the top of the mast. The bolt can go either way; it doesn't matter which side of the mast the nut is on.
      3. Put the second forestay tang on the bolt. Put the tang from the other upper shroud on the end of the bolt and install the ny-lock nut. DO NOT TIGHTEN THE NUT. Drive the nut on just far enough to remove most of the slop between the tangs and the mast. The tangs should still rotate freely. Of you over-tighten the nut, it could dent and weaken the mast.
      4. Use a pin and cotter ring to attach a turnbuckle to the bottom end of each upper shroud.
      5. Use a pin and cotter ring to attach the turnbuckles for the UPPER SHROUDS to the AFT HOLE in the chain-plate (one on each side of the boat).

    7. Do these steps to Install the forestay (See Fig 3 and Fig 4)
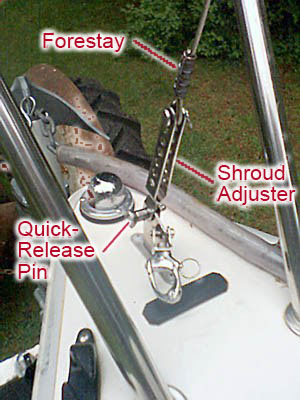
    8. FIG 4
      1. Put the bolt or pin through one of the forestay tangs.
      2. Put the forestay and the jip halyard pulley on the bolt. The pulley can be installed on either side of the forestay, it doesn't matter.
      3. Put the bolt or pin through the other forestay tang and then install the ny-lock nut or a washer and cotter pin.
      4. Use a pin and cotter ring to connect the shroud adjuster (or turnbuckle) to the bottom end of the forestay. If you have a shroud adjuster, connect the forestay to the end-most hole on the end with a bunch of holes. Put a quick-release pin in the single hole at the other end. This pin will be used when you raise the mast. The bottom end of the forestay is not connected until the mast is up.

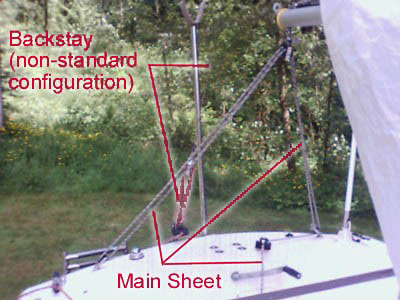
    9. Do these steps to install the backstay (the backstay is optional, your boat may not have one) (See Fig 5):
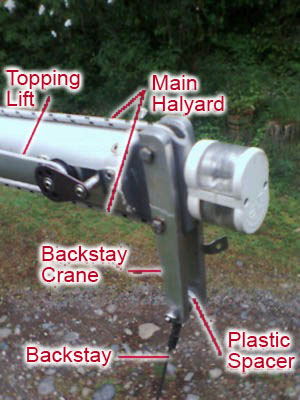
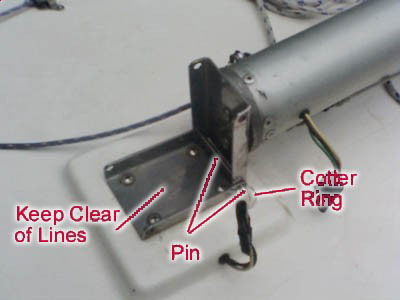
    10. FIG 5
      1. Use a bolt or pin to connect the backstay to the bracket (backstay crane) that extends off the back of the mast. If you have them, use plastic spacers or a few stainless-steel washers to keep the backstay centered on the bolt/pin.
      2. Use a pin and cotter ring to connect a shroud adjuster (or turnbuckle) to the bottom end of the backstay. If you have a shroud adjuster, connect the backstay to the end-most hole on the end with a bunch of holes.
      3. Use a pin and cotter ring to connect the shroud adjuster to the chain-plate on the back of the boat. Start by connecting it to the higher hole.

  3. Install the Halyards
    1. Do these steps to install the main halyard. Use the longest line for the main halyard (See Fig 6 and Fig 5):
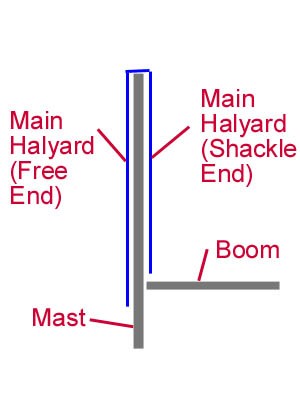
    2. FIG 6
      1. Thread the line through the top of the mast. There should be to small sheaves (pulley wheels) in the top of the mast. Thread the line so that it goes over the top of both of these sheaves.
      2. Pull half of the line through the top of the mast and run one end down the front of the mast and one end down the back of the mast (the back of the mast is the side with the groove in it).
      3. Tie a shackle to the end of the line that goes down the back side of the mast. Secure this end of the line temporarily to the lower part of the mast.
      4. Pull the other end of the halyard to remove the slack and cleat this end of the halyard to one of the cleats on the side of the mast. Tie a knot in this end of the line so that is cannot run back through the sheaves.
      5. Check that the section of the halyard that is on the BACK side of the mast is BELOW all of the shrouds. And, that the section of the halyard that is on the FRONT side of the mast is ABOVE all of the shrouds. That is, make sure the shrouds can be pulled out to the side without tangling with the halyard. Also make sure the forestay is not tangled with the halyard.

    3. Do these steps to install the jib halyard (See Fig 7 and Fig 3):
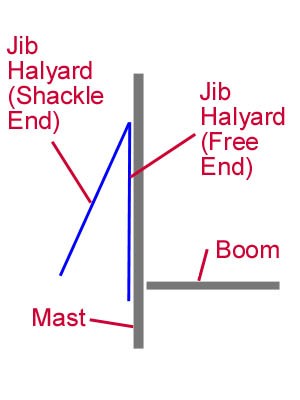
    4. FIG 7
      1. Thread the line through the pulley that is attached at the top of the forestay.
      2. Pull half of the line through the pulley and run both ends down the front of the mast.
      3. Tie a shackle to one end of the line. Secure this end of the line temporarily to the lower part of the mast. The halyard pulley should swivel to orient correctly regardless of which end you tie the shackle to, but if your pulley does NOT swivel, then select the ends of the line so that the line will not cross itself when you cleat the other end of the halyard.
      4. Pull the other end of the halyard to remove the slack and cleat this end of the halyard to the cleat on the other side of the mast. Tie a knot in this end of the line so that is cannot run back through the pulley.
      5. Check that both sections of the halyard are ABOVE all of the shrouds. That is, make sure the shrouds can be pulled out to the side without tangling with the halyard. Also make sure the forestay is not tangled with the halyard.

    5. Do these steps to install the topping lift. The topping lift is optional; your boat may not have it. The topping lift generally uses a smaller line than the halyard lines (See Fig 5):
      1. Thread the line through the pulley (block) that is attached to the side of the mast, right near the top.
      2. Pull half of the line through the pulley and run both ends down the side of the mast.
      3. Tie a shackle or clip to the end of the line that comes from the AFT side of the pulley. Secure this end of the line temporarily to the lower part of the mast.
      4. Pull the other end of the line to remove the slack and cleat this end of the halyard to the second cleat on the side of the mast. Tie a knot in this end of the line so that is cannot run back through the pulley.
      5. Check that both two sections of the line run on the proper side of the shrouds. That is, make sure the shrouds can be pulled out to the side without tangling with the line. Also make sure the forestay is not tangled with the line.
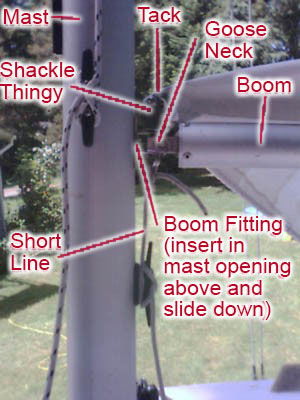
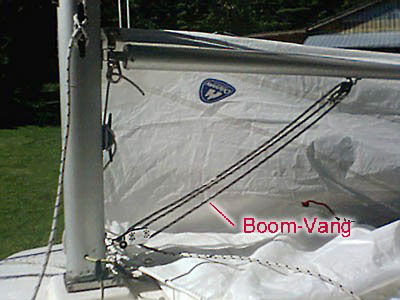
  4. Install the Main Sheet
    1. Here’s how to rout the main sheet (See Fig 8):
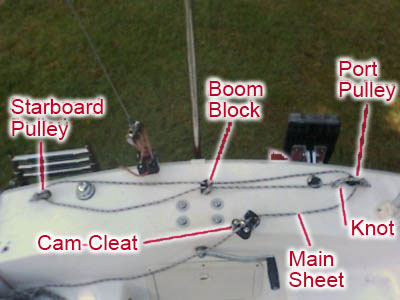
    2. FIG 8
      1. If the two pulleys are not installed on the aft deck, then install them. The pulley with the becket (the extension to tie the end of the line to) goes on the port side.

        Note: The pulley with the becket can be installed on the other side. But, in order to get the correct main sheet arrangement (of 2 lines going up to the boom from each side of the boat) the mainsheet must go from the cam-cleat to the pulley with the becket first. If you mount the pulley with the becket on the starboard side, then the mainsheet will have to run from the cam-cleat over the hump of the stern deck. I don’t see any reason to do it this way.

      2. Take one end of the line and go through these items in order: The cam-cleat -- the port side pulley -- the aft sheave of the boom-block -- the starboard pulley -- the forward sheave of the boom-block -- tie the end to the becket on the port pulley. Oh, just look at the picture! :)

Section 2 -- How Do I Get the Boat Ready to Sail?

Note: I will assume in this section that you have a mast that has all of the shrouds, stays, and lines (halyards etc.) rigged on the mast. I will mention a little about initially tuning the rig (tightening the shrouds and stays), but I will not go into great detail here. The latter part of this procedure will cover rigging the boom.

  1. Raising the Mast:
  2. Note: There are two basic ways to raise the mast: 1. Manually lift it directly, or 2. Use a mast raising system. This procedure does not currently go into detail on how to use a mast raising system. The mast can be raised by one person, but if this is your first time raising the mast, then find a second person to help you (don’t make me say "I told you so" :) ).

    WARNING: Regardless of how you raise the mast, if you do NOT have baby stays, then someone MUST hold the mast to keep it from twisting to the side. Baby stays are wires that are attached low on the mast and to fittings on the cabin top.

    WARNING: If you are not experienced at raising the mast, then only do it on level ground and in light winds. Winds or an angle (side-to-side, or for-and-aft) will make it more likely that you could loose control of the mast.

    1. Do these steps to position the mast for raising:
      1. Remove all straps, etc., that you have holding the mast down and holding stuff to the mast.
      2. Install the wind vane if you have one (I always forget this).
      3. Remove the pin that attaches the mast to the bow pulpit and gently set the end of the mast down.
      4. Go back to the cockpit and pickup the mast and move it back. I find standing on the front of the cockpit seat and reaching forward a bit with one had allows you to move the mast most easily. Continue to move the mast back until it is aligned with the mast step (See Fig 9). Be careful not to trip over the stays that are dangling off the mast.


        FIG 9

      5. Go to the mast step and install the aft pivot pin and its cotter ring (See Fig 9). You can use the same pin that held the mast to the bow pulpit.

    2. Arrange all the stays and shrouds as follows:
      1. Bring the bottom end of the forestay forward and make sure it is on top of all the other wires and not tangled with other things.
      2. Put the backstay (if you have one) on the ground behind the boat. Make sure it is not tangled.
      3. Loosely arrange the shrouds on either side of the boat. Make sure the turnbuckles are not terribly twisted.

        Note: If you haven’t raised the mast before and don’t know if the shrouds are the correct length, then loosen the turnbuckles on the four shrouds to make sure the mast will go all the way up.

      4. Make sure there are no lines that will get pinched in the mast step (See Fig 9).
      5. JUST BEFORE RAISING THE MAST, make sure the top each of the four shrouds is not twisted around its tang (See Fig 10). This is a common problem, and if you don’t catch it, it really messes up your mast tuning. :)


        FIG 10

    3. Lift the Mast Without the Mast Raising System:
    4. WARNING: Look up! Make sure there is nothing up their that the mast will hit as you lift it. Especially, make sure their is a lot of distance between you and any power lines. If the mast hits or even comes near a power line, it can kill you. With some high-voltage lines, the electricity can jump a foot or more from the wire to your mast. While you are looking up, also look for power lines, trees, etc. between you and the water where you will launch.

      1. If you are NOT using the mast raising system, then I find this works: Stand on the cabin top to one side of the mast. Place one foot next to the cabin hatch, right at aft edge of the cabin top. Place the other foot just forward of the (closed) cabin hatch. Squat down, grab the mast, and lift with your legs. Once the mast is half way up, things get a lot easier, so I do the initial lift with a quick jerk. REMEMBER, YOU MUST CONTROL THE SIDE-TO-SIDE MOTION OF THE MAST (if you don’t have baby stays). A second person can make this easier. Have the second person stand in the cockpit and help lift the mast. The second person can stand on a cockpit seat so they can lift higher.
      2. Once the mast is vertical, the shrouds should keep it from going too far forward, or from going sideways. At this point, grab the forestay -- and holding it tightly and pulling -- walk forward to the bow.
      3. Attach the forestay to its chain-plate with it‘s quick-release pin (See Fig 4). It attaches to the forward hole in the chain-plate (the tack of the jip attaches to the aft hole). When the rig is properly tuned (See tuning instructions below), it will be difficult to pull the forestay had enough to install the quick-release pin. You may need help form another person, or the installation of a shroud lever, to get it tight enough.

        Note: If you have not tuned the rig, then do NOT install the forward pin in the mast step. If you have already tuned the rig, then you can install the forward pin in mast base BEFORE you connect the forestay. The second pin is never necessary. There is some discussion about whether it is better to install the second pin or not.


        FIG 4

    5. Lift the Mast With the Mast Raising system:
    6. WARNING: Look up! Make sure there is nothing up their that the mast will hit as you lift it. Especially, make sure their is a lot of distance between you and any power lines. If the mast hits or even comes near a power line, it can kill you. With some high-voltage lines, the electricity can jump a foot or more from the wire to your mast. While you are looking up, also look for power lines, trees, etc. between you and the water where you will launch.

      CAUTION -- This procedure is untested. It may have significant mistakes!

      1. Connect the gin-pole to the mast.
      2. Attach the shackle-end of the jib halyard to the top end of the gin-pole.
      3. Attach the lifting tackle to the top of the gin-pole and the AFT hole on in the forestay’s chain-plate.
      4. Pull on the free end of the jib halyard until the gin pole tilts slightly toward the back of the boat, and cleat the halyard off securely to the mast.
      5. Pull on the lifting tackle to lift the mast. REMEMBER, YOU MUST CONTROL THE SIDE-TO-SIDE MOTION OF THE MAST if you don’t have baby stays.
      6. When the mast is up, attach the forestay to its chain-plate with it‘s quick-release pin (See Fig 4). It attaches to the forward hole in the chain-plate (the tack of the jip attaches to the aft hole).

        Note: If you have not tuned the rig, then do NOT install the forward pin in the mast step. If you have already tuned the rig, then you can install the forward pin in mast base BEFORE you connect the forestay. The second pin is never necessary. There is some discussion about whether it is better to install the second pin or not.

      7. Remove the lifting tackle and the gin-pole.

    7. Initial tuning:
    8. Note: This tuning procedure will get you sailing, but you should refer Dr. Judy’s more advanced procedure for a more complete procedure.

      1. Tighten the lower two shrouds until the slack is just removed from them.
      2. Make sure the backstay (if you have one) is slack. If it is tight, then disconnect it.
      3. Examine the forward hole in the mast step. Is the hole in the mast bracket higher or lower than the hole in the deck bracket?
      4. Adjust the forestay until the forward holes in the mast step are approximately aligned. If anything, have the holes in the mast bracket slightly lower than the holes in the deck bracket. To adjust the forestay, have someone hold the mast forward, and then remove the pin and connect the forestay to a different hole in the stay adjuster (See Fig 4).
      5. After you have the forestay adjusted and re-secured, tighten the lower shrouds until you can hear them make a tone when you strike them. Tighten both shrouds equally.
      6. Tighten the upper shrouds until they also make a tone when you strike them.
      7. When the shrouds are tight, put your head at the base of the mast and sight up the slot in the back of the mast with one eye. You will probably see that the mast bends one way or the other.
      8. Re-adjust the shrouds until the mast is straight and all four of the shrouds ring when you tap them.
      9. After the shrouds are adjusted, adjust the backstay (if you have one). Adjust it until there is no slack in it. It can be tighter than this if you want, but it will be harder to attach the forestay when you raise the mast.

  3. 2. Installing the Boom
    1. Do these steps to install the boom:
      1. Align the fitting on the front of the boom with the gate-opening in the mast slot (See Fig 11). The little shackle thingy on the fitting goes up. Slide the boom fitting down the mast slot. Tie a short line to the metal loop on the bottom of the boom fitting. Cleat the other end of this line to the cleat in the mast slot. Cleat it with an inch or two of line between the boom and the cleat.


        FIG 11

      2. If you have a topping lift, disconnect the aft end of it from the mast and clip it to the aft most attachment on the end of the boom (See Fig 12). Adjust and cleat the other end of the topping lift so that the boom is roughly level.


        FIG 12

      3. Loosen the mainsheet and pull the boom block up and attach it to the bottom of the boom. A quick-release pin is useful here (See Fig 12 and Fig 13).


        FIG 13

      4. Connect the boom vang (if you have one) to the mast with a shackle and quick-release pin (See Fig 14).

        Note: Some people prefer to have the adjustable end of the boom vang at the boom instead of at the mast. Do whichever you prefer.


        FIG 14

  4. Installing the Main Sail:
    1. Do these steps to install the main sail:
      1. Attach the lower forward corner of the sail (the "tack") to the shackle thingy on the front of the boom (See Fig 11).
      2. Use a shackle to attach the lower aft corner of the sail (the "clew") to the aft end of the boom (See Fig 12). If you have a track and car for adjusting the tension in the foot of the sail, then attach the clew to this car.
      3. Disconnect the shackle-end of the main halyard from the mast and connect the shackle to the top of the sail (the "head").
      4. Insert the top end of the boltrope (the fat rope at the front edge of the sail), or the first slide (if you have slides) into the slot in the mast. Pull the sail up a foot or so with the halyard and cleat the halyard.

        Note: When you start the sail up the track, you must make sure there is not a twist in the sail. You can do this by starting at the tack (the bottom forward corner of the sail), and working your hands all the way to the head of the sail, making sure the sail doesn't cross itself as you go.

      5. If the battens are not in the sail, now is the time to put them in. Do these steps:
        1. Determine which batten goes in each pocket.

          Note: On my mainsail, the top batten is the shortest, the bottom batten is the next shortest, and the two center battens are the same length. Your sail may be different. It’s a good idea to number the battens with a permanent pen after you figure out where they go. This will saver time the next time you install them.

        2. Start the batten into its pocket. If one end of the batten is thinner or more flexible, that end goes in first.
        3. Work the batten in until the back end can pushed completely into the pocket. When it’s all the way in, you will be able to push the back end of the batten down slightly so that it is no longer aligned with the opening in the pocket. This will keep the batten from falling out.

          Note: It is OK to store the sail with the battens installed, but if you do, make sure the battens are not bent. Often the sail won’t fit in its bag with the battens installed. If you store the sail with the battens bent, the battens will take a permanent set. Bent battens are not good for sail performance.

          Note: The sail is now ready to hoist. Don’t raise the sail before you are ready to actually sail. You don’t want the boat trying to sail when launching it.

  5. Installing the Headsail (Jib, Lapper, or Genoa):
    1. Do these steps to install the jib, lapper, or genoa:
    2. Note: This applies to hank-on sails only. It does not apply to the CDI furler.

      1. Use a shackle to connect the tack of the sail to the aft hole in the forestay’s chain-plate. To find the tack corner of the sail, find the edge of the sail that has the hanks on it. Then find the corner on this edge that is LESS sharp. This is the tack (the bottom forward corner). The sharp corner is the head (top) corner.
      2. After the tack is attached, clip the hanks onto the forestay. Start with the bottom hank and work your way up. It is possible to get a hank on the wrong direction; all the hanks should face the same direction. If a hank is backwards, it will put a wrinkle in the sail when it is up.
      3. When all the hanks are connected, then connect the shackle on the jib halyard to the head (top) of the sail.
      4. Tie the jib halyards to the clew of the sail (the clew is the third unattached corner of the sail). You can either use one long line or two shorter lines for the jib sheets. If you use one long line, then tie the middle of it to the clew.
      5. Run one sheet to each side of the boat. Ideally, the sheets will run as follows, depending on which sail you are using:
        • If you are flying the jib (the smallest headsail) -- Run the sheet through a lead block (pulley) at about the center of the forward of the two main cabin windows. Run the sheet from here to the cam-cleat at the cockpit.
        • If flying the lapper (the medium size head sail) -- Run the sheet between the upper and lower shrouds to a lead block at about the center of the aft cabin window. Run the sheet from here to the cam-cleat at the cockpit.
        • If flying the genoa (the largest headsail) -- Run the sheet outside both of the shrouds to a lead block at about the forward edge of the cockpit. Run the sheet from here to the cam-cleat at the cockpit.
      6. After the sheets are run correctly, tie a knot in the end of each sheet so it will not slip back through the cam-cleat.

        Note: The sail is now ready to hoist. Don’t raise the sail before you are ready to actually sail. You don’t want the boat trying to sail when launching it. A bungee cord or sail tie is a good way to keep the head sail constrained until you are ready to raise it.


    Return to "Many Ways to Potter" Page

    Potter Yachters Home Page