Installing Genoa Tracks on Redwing's Cabin Top
by Judith Blumhorst, DC
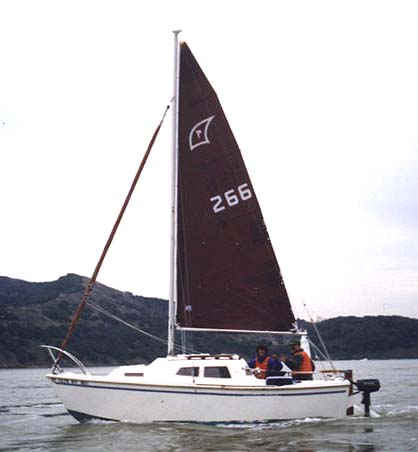
1985 WWP-19 #266 "Redwing"
"The most impressive Potter had to be Redwing, Judy was up to 4:AM
the day before the sail working on her. Judy mounted the genoa
tracks on the cabin top to get better performance to weather. I
gotta tell you, this potter really moves upwind. We were out in the
Bay with about 15 MPH. wind and two-foot chop and I couldn't catch
her. She was pointing extremely close and really moving. I later
found out that her crew David was doing the sailing. WOW! I was
impressed." Jerry Barrilleaux, Commodore, Potters Yachters, Feb 17,
1999.
Why put the tracks on the cabin top?
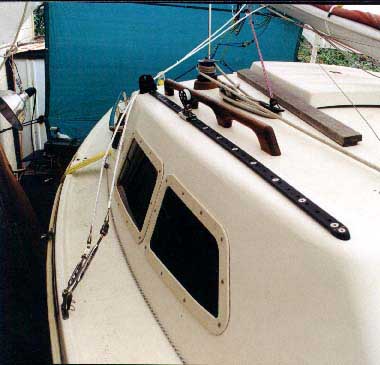 In
two words, the answer is "Upwind Performance." Potter 19's aren't
exactly famous for their ability to point. It's easy to see why,
since most folks follow the directions in the owner's manual and run
the jib sheets outside the shrouds.
With the jibsheets outside the shrouds, the sheeting angle is about
30 degrees off the centerline of the boat. Compared to most boats,
that's a very wide angle! The classic place to put your genoa tracks
is about 8 or 9 degrees off the centerline for a working jib (usually
defined as being less than 100% of the area of the foretriange).
Classically, you want a sheeting angle of about 9 or 10 degrees off
centerline for a 115% jib. The typical sheeting angle for a 150%
genoa is about 12 degrees off the centerline.
The outside edge of the cabin top is as close to the centerline as I
could get and still have room to run 8 lines aft to the cockpit later
on. I placed the genoa tracks just outboard of the usual location
for the teak handrails. It's about 15 degrees off the centerline.
Another consideration was the structural load on the boat. The cabin
top is very strong where the cabin wall makes a corner with the cabin
top.
Another advantage of putting the tracks here is that I can
reach the sliding cars easily from the companionway and cockpit. I
can adjust the lead forward and aft for different wind conditions to
keep the right amount of tension on the foot and leech of the jib.
Clew height of the jib is another consideration. Both the P19's
working jib (32 square feet, which is about 50% of the foretriangle)
and the lapper (67 square feet, which is about 105% of the
foretriangle) have very high clews. That's a nice feature on a
cruising jib, because it makes it easy to see under the sail while
you're underway. The high clew also makes it possible to put the
tracks on the cabin top; you couldn't put them up there if the clew
were lower. For the deck-sweeping factory genoa, you'll probably
have to lead the sheets lower to the side deck .
Why You May NOT Want the Tracks on the Cabin Top
There's a tradeoff between performance upwind and the "don't scare
the new buyer (or spouse)" factor. With a wide sheeting angle, you
can't point for beans, but the jib tends to spill wind when it gusts
or blow mightily -- so you don't scare the novice sailor by heeling a
lot.
In heavy winds, in order to spill wind and reduce heeling, many
cruisers adjust their tracks somehow so that they have a wider
sheeting angle of perhaps 15 to 25 degrees. They have a gadget
rigged called a "barberhaul" (which would not be hard to do on a
Potter 19 using the factory genoa sheet lead) or they can use a
different track. On race boats, the skipper doesn't want to
sacrifice pointing ability so s/he requests more "rail meat" -- s/he
tells the crew to go sit on the upwind rail and act as human ballast
to keep the boat from heeling too much.
So if you're new to sailing, or you don't want to scare your spouse,
you may not want to put your genoa tracks this close to the
centerline.
Hardware and Materials
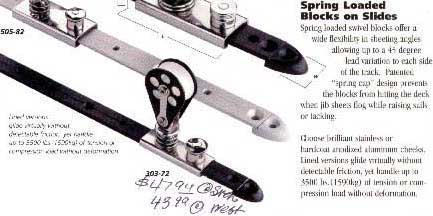 The
track I selected was Schaefer 1" black anodized aluminum race track
(part #40-64, about $40 per section), with a four foot long section
on each side of the cabin top. I chose it mainly because I really
liked the Schaefer cars.
Schaefer cars have a polyethylene liner inside the stainless slide
that is held captive by the design of the car and slides easily under
load. I selected car #303-86, a lined car with a spring loaded
swivel block and a spring loaded stop pin that's easy to pull, even
if your hands are cold and wet. They are reasonably priced at about
$45 each. (They look just like the 303-72's in the picture above,
but the303-72's don't have the liners in the car.) Each track
required two plastic end-stops (Schaefer part #74-35, about $2.50
each).
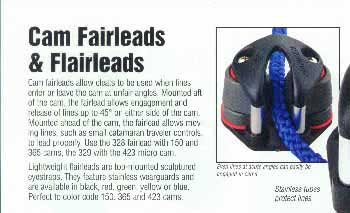 For cleating, I selected Harken "cam-matic" cam cleats (part #150,
mwl of 300 pounds) with a wide angle fairlead (part #328). To get a
fair lead from the sheet blocks, I put the whole thing on top of a
flat 7/8" cam-cleat riser (part #295). The assembled camcleat and
fairlead on the riser cost about $34.
Mounting the tracks required about thirty stainless steel 1/4" x
1-3/4 flathead machine screws, with 1/4" fender washers for backing
and locknuts. Mounting the fairleads required four 4" #10 flathead
machine screws with fender washers and locknuts.
Miscellaneous other materials were needed. I used West System epoxy
resin and colloidal silica thickener #406 for making fillets (1/2"
epoxy cores around each hole I drilled). I used Life Caulk (thiokol
polysulfide) for bedding the machine screws for the tracks for it's
flexibility and long life. Life Seal (combination silicon and
polyurethane sealant) was the bedding compound of choice for bedding
the track ends and fairleads, for it's superior adhesion than silicon
and it's ease of removal. (You might need to change a damaged genoa
car or camcleat).
The usual assortment of mixing cups, sticks, nitrile gloves (do not
use latex gloves -- they melt when they contact epoxy!), rags paper
towels, alcohol (for wiping up excess caulking), and blue masking
tape was on hand (the kind that doesn't dry out and stick almost
permanently to your boat.)
The whole project cost about $350 in hardware, stainless steel
fasteners, caulking and miscellaneous supplies. It took about twenty
five hours spread out over four or five days.
Tools
All you need is a cordless drill/screwdriver, a good set of drill
bits up to 1/2", a cone shaped rasp for the drill, a few box
wrenches, a set of socket wrenches, and a screwdriver.
The Layout and Drilling
Never put fasteners through holes drilled a wood-cored deck (or
transom). "Huh, what's that?" you say, "You gotta drill through the
wooden cored cabin top to attach the tracks." Okay, here's the trick
answer -- you don't drill holes, you build fillets.
To prevent inevitable wood rot in your cored deck, you need to make a
fillet for every place you want to drill a hole. A fillet is an area
of solid fiberglass or epoxy to drill through. When you drill
through a fillet, you don't cut through any wood. There's no wood
grain exposed, just plain resin or well-saturated fiberglass
If the manufacturer didn't give you a fillet-ed area to lay your
track, you can make something just as effective with a drill and some
epoxy resin. If you drill a 1/2" hole in your cored deck, fill it
with epoxy, and then drill a 1/4" hole in the epoxy, you will never
have to worry about core rot. It's a damned lot of work, but you
will never have to worry about core rot. Never. At least not from
your work!
First I laid out the track on the cabin top with masking tape and
marked the 1/4" holes. I made sure the lead from the blocks on the
tracks was perfectly fair to the camcleat. I taped the track and
camcleats to the cabin top with blue masking tape. I ran lines
through the blocks and fairleads to be sure the leads were fair.
Remember the old saying, measure twice and cut once.
With the track was taped to the cabin top, I drilled the front and
back 1/4" holes for each track through the track and bolted the track
to the cabin top. Then I drilled the holes in between, using the
actual track as my guide. Then I drilled the 1/4" holes for the
track stops. Finally, I marked the holes for the camcleat and
drilled 1/4" holes there also, even though were going to be fastened
with #10 machine screws.
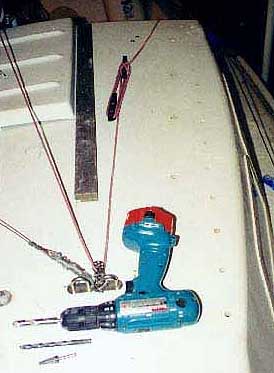 Drilling the 1/4" holes went well, but when I went to the 3/8" drill
bit, the top layer of gelcoat and coarse fiberglass shattered and
chipped. So I used a drill rasp to grind the top skin of the hole a
little each time and then used a slightly larger drill bit.
Finally, after drilling about 90 times, and grinding about 60 times,
I had nice clean 1/2" holes through the gelcoat, fiberglass, and wood
core.
By the way, be sure to remove the carpet-like headliner from the area
you're drilling. If you don't, the drill bit will catch in the
fibers of the headliner and break the drill bit, and maybe some piece
of your anatomy .
Making Epoxy Fillets
Making the fillets is the easiest and most fun part of this project
(except sailing the boat to weather after you're finished)
Here's how you do it. I taped the bottom of the holes from the
inside of the cabin. I mixed up some epoxy resin and thickened it to
a consistency halfway between ketchup and peanut butter using
colloidal silica. I added some white coloring agent to make it a
nice white to match the gelcoat (even though nobody will ever see
it.)
Next I put it into a heavy ziplock bag and cut off the corner. I squeezed
just enough into each hole to be as close to perfectly level as I could manage.
With a little practice you can get within 1/32 to 1/64" of the
surface. Let it cure until it has completely hardened, up to 24-36
hours if it's cold out. (You'll need to heat the boat with lamps or
a heater if it's below 40 degrees F.) Wait patiently, don't go on to
the next step before the epoxy has fully cured.
Mounting the Tracks
Now I was ready to drill the final holes and mount the track.
I marked the centerline of the first and last track holes. I drilled
a 1/4" hole precisely through the middle of the rearmost fillet and
put a machine screw with a nut in to hold the track still. Then I
drilled a hole in the front of the track and put a screw and nut in
to hold it. With the track in place, I drilled the holes in between,
dropping a screw into each hole as I went.
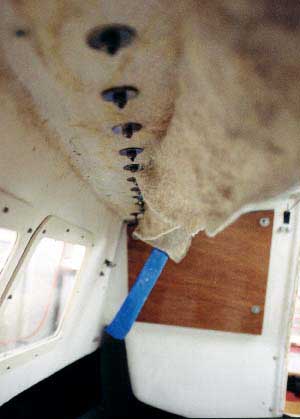 Then I crossed my fingers and took all the track off to inspect the
alignment of my new holes in their fillets. Every hole had gone
through the center of the fillet. I hadn't come close to drilling
through wood. Finally, I was ready to mount the hardware!!
I used the Life Caulk (polysulfide) for mounting the tracks. It
lasts practically forever. It sticks to everything forever. It's
hard to remove anything set in polysulfide after a year or two, but I
don't think I'll be needing to remove the track for any reason. It's
yucky, messy stuff to use. I prefer to use a caulking gun rather
than those small squeeze tubes and I keep lots of rags and rubbing
alcohol around to clean up as I go. I wear cheap latex gloves and
change them if they get sticky. You have to be super careful, or
else you end up with "gook and putty" everywhere.
Every hole in the track got a dab of polysulfide around it. Then I
took a nail and smeared a little inside the hole. Then I attached it
with a 1/4" screw, 1/4" fender washer, and locknut. A little gook
came through each hole to the cabin roof underside, which is good.
For the track stops and fairleads, I used Life Seal (polyurethane and
silicon combo) to bed the screws. That's so that I can remove them
if I need to replace a broken part. All bolts were backed with
fender washers on the underside of the cabin.
Now, let's go sailing…
 For cleating, I selected Harken "cam-matic" cam cleats (part #150,
mwl of 300 pounds) with a wide angle fairlead (part #328). To get a
fair lead from the sheet blocks, I put the whole thing on top of a
flat 7/8" cam-cleat riser (part #295). The assembled camcleat and
fairlead on the riser cost about $34.
  In
two words, the answer is "Upwind Performance." Potter 19's aren't
exactly famous for their ability to point. It's easy to see why,
since most folks follow the directions in the owner's manual and run
the jib sheets outside the shrouds.
  The
track I selected was Schaefer 1" black anodized aluminum race track
(part #40-64, about $40 per section), with a four foot long section
on each side of the cabin top. I chose it mainly because I really
liked the Schaefer cars.
  Drilling the 1/4" holes went well, but when I went to the 3/8" drill
bit, the top layer of gelcoat and coarse fiberglass shattered and
chipped. So I used a drill rasp to grind the top skin of the hole a
little each time and then used a slightly larger drill bit.
  Then I crossed my fingers and took all the track off to inspect the
alignment of my new holes in their fillets. Every hole had gone
through the center of the fillet. I hadn't come close to drilling
through wood. Finally, I was ready to mount the hardware!!